Blinds and Curtain Cleaning: The Vacuum Cleaner Attachment Techniques for Dust-Free Windows
Learn how to properly clean your blinds and curtains using vacuum attachments. This guide covers techniques for all window treatment types and solves common cleaning challenges.
This post may contain affiliate links. If you make a purchase through these links, we may earn a commission at no additional cost to you.
Window treatments transform living spaces through light control, privacy, and design, but they also serve as significant dust collectors in our homes. Every time you open or close your blinds or curtains, you might notice a small cloud of dust particles dancing in the sunlight – a visual reminder of what’s accumulating on these surfaces day after day.
Keeping blinds and curtains clean isn’t just about aesthetics – it’s about maintaining healthy indoor air quality and extending the life of your window treatments. Traditional cleaning methods can be time-consuming and ineffective, often just redistributing dust rather than removing it. That’s where your vacuum cleaner becomes an invaluable tool.
This comprehensive guide will walk you through everything you need to know about using vacuum attachments to achieve dust-free window treatments. We’ll cover the science behind dust accumulation, the most effective vacuum attachments for different window treatment types, step-by-step techniques for various blinds and curtains, and maintenance strategies to keep your window coverings looking fresh between deep cleanings.
Whether you’re dealing with delicate sheers, sturdy wooden blinds, or anything in between, you’ll discover how to leverage your vacuum’s power to maintain cleaner, healthier window treatments with minimal effort.
Understanding Dust Accumulation on Window Treatments
The Science of Dust Collection
Window treatments act as perfect dust magnets for several reasons. Their vertical positioning places them directly in airflow paths, their materials often create static electricity that attracts particles, and their complex surfaces offer countless nooks where dust can settle.
Dust isn’t just unsightly – it’s a complex mixture of potentially harmful particles. Household dust typically contains:
- Dead skin cells (from humans and pets)
- Textile fibers
- Pollen and plant material
- Soil particles
- Insect fragments
- Mold spores
- Bacteria
When these particles accumulate on your window treatments, they don’t just look unappealing – they can significantly impact your home’s air quality and trigger allergies or respiratory issues for sensitive individuals.
Factors Affecting Dust Accumulation
The rate at which your window treatments collect dust depends on various factors:
- Location: Urban homes typically experience more dust than rural settings
- Household activity: Homes with children and pets generate more particles
- Ventilation patterns: HVAC systems and natural airflow direct dust movement
- Material composition: Some fabrics and materials attract dust more readily
- Treatment design: Complex designs with more surface area collect more dust
- Humidity levels: Drier environments create more static electricity, attracting dust
Understanding these factors helps you determine how frequently your window treatments need cleaning. For most households, window treatments should receive attention at least monthly, with more frequent cleaning in high-dust environments or for those with allergies.
The Hidden Cost of Dusty Window Treatments
Beyond the obvious aesthetic impact, dusty window treatments can:
- Reduce treatment lifespan: Dust particles are abrasive and can degrade materials over time
- Decrease light transmission: Dirty blinds and curtains block more light than clean ones
- Distribute allergens: Opening and closing dusty treatments releases particles into the air
- Create unpleasant odors: Dust absorbs environmental odors and can make rooms smell stale
- Attract pests: Dust mites thrive in dusty environments, especially in fabric treatments
Regular cleaning with proper vacuum techniques addresses these issues and helps maintain both your window treatments and your home’s air quality.
Types of Vacuum Attachments for Window Treatments
Using the right attachment transforms your vacuum from a floor-cleaning tool to a precision instrument for window treatment maintenance. Let’s explore the most effective options:
Standard Vacuum Attachments
Most vacuum cleaners come with a basic set of attachments that can be repurposed for blind and curtain cleaning:
- Dusting brush: Soft bristles make this ideal for delicate materials and surfaces where scratching is a concern. The circular or oval brush design helps dislodge dust while the bristles prevent damage.
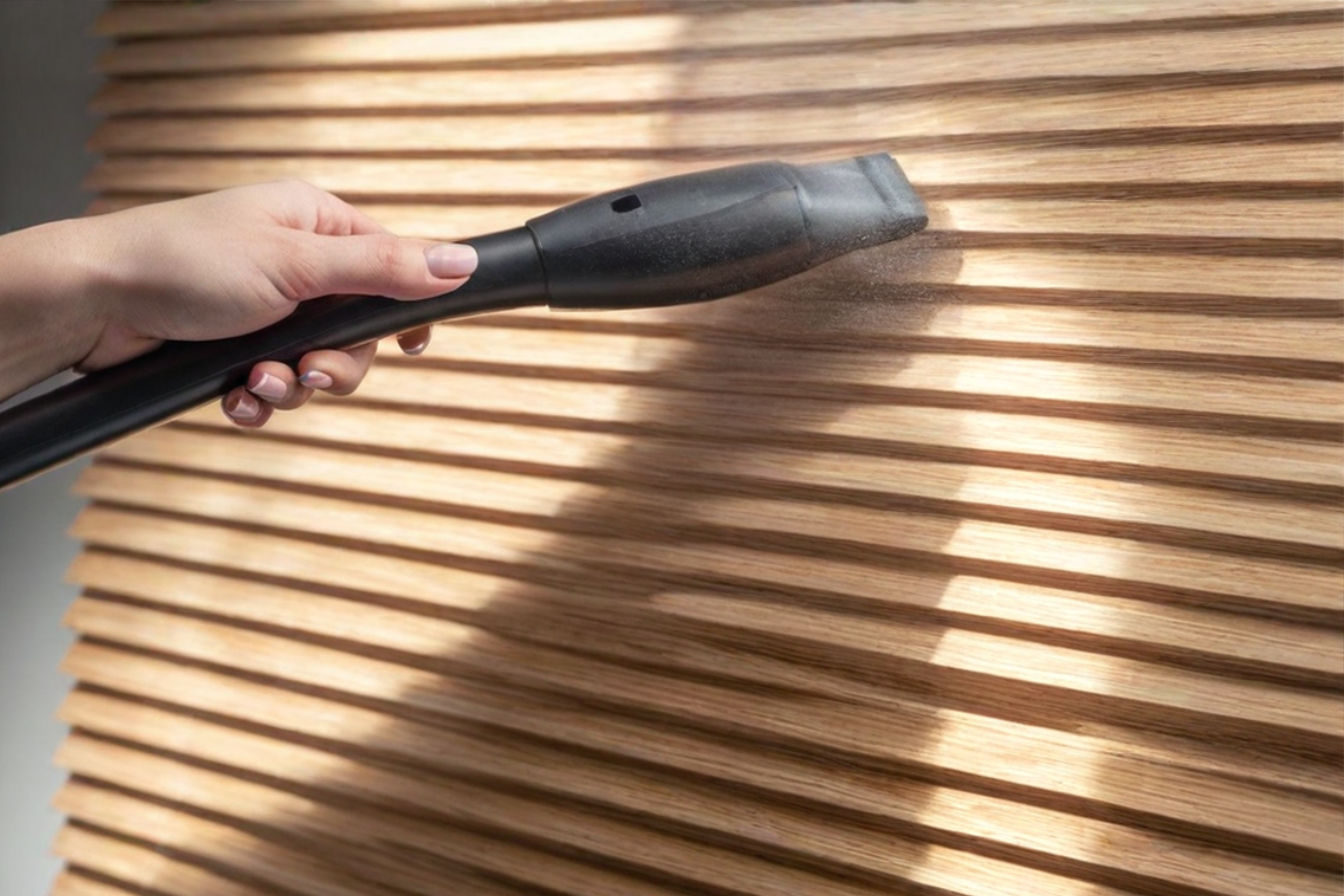
- Crevice tool: This narrow, angled attachment reaches between blind slats and into pleated curtain folds. Its concentrated suction makes it excellent for edge cleaning and targeted dust removal.
- Upholstery tool: Designed for furniture, this wider attachment often features a lint strip that works well on fabric curtains and drapes. Its broader surface area makes it efficient for larger fabric treatments.
Specialized Blind Cleaning Attachments
For those serious about window treatment maintenance, specialized attachments offer superior results:
- Blind cleaning tools: These feature multiple prongs or brushes designed to clean several slats simultaneously. They’re configured to slide between horizontal blind slats, cleaning both top and bottom surfaces in one pass.
- Venetian blind attachments: Specifically designed for horizontal blinds, these attachments feature multiple brush heads that can clean several slats simultaneously, dramatically reducing cleaning time.
- Radiator/blind attachments: These thin, flexible attachments can reach into tight spaces between blinds and windows, accessing dust that standard attachments might miss.
Brush Attachments Explained
Brush attachments are particularly valuable for window treatments because they:
- Dislodge dust through mechanical action
- Reduce static electricity that binds dust to surfaces
- Prevent scratching on delicate materials
- Create a seal against irregular surfaces for better suction
Look for brushes with the following characteristics for optimal cleaning results:
- Natural bristles for wooden blinds (less likely to scratch)
- Synthetic bristles for vinyl and aluminum (better static reduction)
- Adjustable bristle length for different treatment types
- Swivel heads for easier maneuvering
Attachment Selection Guide
| Window Treatment Type | Best Primary Attachment | Alternative Attachment |
|---|---|---|
| Horizontal plastic/aluminum blinds | Blind cleaning tool | Dusting brush |
| Wooden blinds | Natural bristle brush | Blind cleaning tool |
| Vertical blinds | Upholstery tool | Dusting brush |
| Cellular/honeycomb shades | Upholstery tool (low suction) | Dusting brush |
| Sheer curtains | Upholstery tool (low suction) | Soft dusting brush |
| Heavy drapes | Upholstery tool | Crevice tool for pleats |
| Blackout curtains | Upholstery tool | Dusting brush |
| Roman shades | Dusting brush | Upholstery tool |
Vacuum Cleaning Techniques for Different Blind Types
Different blind styles require specialized approaches. Let’s examine the most effective techniques for each common type:
Horizontal Blinds (Aluminum, Vinyl, Wood)
Horizontal blinds present a particular challenge because of their multiple slats and the difficulty of cleaning both top and bottom surfaces.
Step-by-step vacuuming process:
- Prepare the blinds: Fully extend them and rotate the slats to a fully open position (horizontal).
- Select your attachment: A blind cleaning tool is ideal, but a dusting brush attachment works well too.
- Adjust your vacuum: Set to medium suction to avoid bending thin slats.
- Begin at the top: Start at the highest point and work your way down to prevent redistributing dust.
- Clean systematically: Hold the attachment against the top surface of the slat, moving from center to edge, then center to opposite edge. Repeat for each slat.
- Rotate the slats: Flip the blinds to the opposite position to access the reverse side.
- Repeat the process: Clean the newly exposed sides of each slat.
- Edge cleaning: Use a crevice tool along the sides where dust tends to build up against the cord mechanism.
Material-specific considerations:
- Aluminum blinds: Can withstand stronger suction but may dent if pressed too firmly
- Vinyl blinds: Flexible and may bend during cleaning; use gentler pressure
- Wooden blinds: Require natural bristle brushes to avoid scratch marks; avoid excessive moisture from condensation in the vacuum exhaust
Vertical Blinds
Vertical blinds collect dust differently than horizontal varieties and require an adjusted approach.
Attachment selection:
- Upholstery tool for fabric verticals
- Dusting brush for vinyl or aluminum verticals
- Crevice tool for the track mechanism at the top
Directional cleaning techniques:
- Start with the track: Use a crevice tool to clean the top tracking mechanism where dust tends to build up heavily.
- Work with gravity: Clean from top to bottom on each slat.
- Maintain direction: Clean in one direction (usually top to bottom) to prevent redistribution of dust.
- Support the blinds: Hold each vane steady with one hand while vacuuming with the other to prevent swinging.
- Mind the rotation mechanism: Be careful around the connection points at the top of each vane.
Pro tip: For fabric vertical blinds, use a fabric-safe attachment and reduced suction to prevent distortion of the material.
Mini Blinds
Mini blinds present unique challenges due to their narrow slats and often delicate construction.
Dealing with narrow slats:
- Use specialized attachments: Mini blind cleaning tools feature multiple thin prongs designed for narrow slats.
- Reduce suction power: Mini blinds can bend easily under strong suction.
- Support with your hand: Place your hand behind the area being cleaned to prevent flexing.
- Clean fewer slats at once: Work in smaller sections than you would with standard blinds.
Preventing damage:
- Avoid pressing too hard on the attachment
- Be particularly careful around the cord holes where slats are weakest
- Consider using a microfiber cloth after vacuuming to remove any remaining dust
Cellular/Honeycomb Shades
The unique structure of cellular shades requires special consideration to clean effectively without damage.
Gentle cleaning approaches:
- Use lowest effective suction: Too much vacuum power can collapse or distort the cellular structure.
- Select the right attachment: An upholstery tool or broad dusting brush works best.
- Clean in one direction only: Usually top to bottom, following the natural lines of the shade.
- Keep the attachment moving: Don’t linger in one spot, which could cause fabric distortion.
Managing the cellular structure:
- Focus on exterior surfaces only
- Don’t attempt to clean inside the cells/honeycomb structure
- Be especially careful at the edges where cells are attached to the frame
- Consider using the blow function of your vacuum (if available) at a distance to dislodge dust from inside the cells
Wooden Blinds
Natural wooden blinds require special care to maintain their finish and prevent damage.
Material-specific considerations:
- Use natural bristle attachments: These are less likely to scratch or damage wood finishes.
- Clean with the grain: Follow the natural grain pattern of the wood when vacuuming.
- Avoid moisture exposure: Ensure your vacuum exhaust doesn’t direct moist air onto the wood, which can cause warping over time.
Maintenance tips:
- Check for loose slats before vacuuming
- Follow up with a wood-appropriate polish every 3-4 months
- Be cautious around any areas where the finish has already worn away
Curtain Vacuuming Methods
Curtains and drapes come in many varieties, each requiring a tailored approach for effective cleaning.
Lightweight Curtains and Sheers
Delicate curtains require a gentle touch to prevent damage during cleaning.
Attachment selection:
- Upholstery tool with reduced suction
- Soft dusting brush for very delicate fabrics
- Avoid attachments with hard plastic edges that could snag the material
Technique modification:
- Support the fabric: Hold the curtain taut with one hand while vacuuming with the other.
- Use vertical strokes: Work from top to bottom in overlapping sections.
- Maintain constant movement: Don’t let the attachment linger in one spot, which could distort the fabric.
- Clean both sides: Remember to vacuum both sides of sheer curtains as light penetration makes dust visible from either direction.
Pro tip: For extremely delicate sheers, place a clean nylon stocking over the attachment to create an additional barrier between the vacuum and fabric.
Heavy Drapes
Substantial draperies collect significant dust and require more thorough cleaning approaches.
Powerful suction considerations:
- Heavy fabrics can withstand and benefit from stronger suction
- Use the highest setting that doesn’t cause the fabric to be pulled into the vacuum
- Consider using a vacuum with adjustable power settings
Working with pleats and folds:
- Clean outer surfaces first: Vacuum the visible surfaces with an upholstery tool.
- Access pleats: Use a crevice tool to reach inside pleated areas where dust accumulates.
- Pay attention to headers: The top portion of drapes (the header) often collects the most dust due to its proximity to the ceiling and window frame.
- Remember the hemline: The bottom edge of heavy drapes traps dust from the floor; vacuum this area thoroughly.
Blackout Curtains
The special coatings on blackout curtains require careful cleaning to maintain their light-blocking properties.
Special fabric considerations:
- The backing material may be different from the front-facing fabric
- Some blackout linings can be damaged by excessive heat from vacuum motors
- Multi-layer construction creates more spaces for dust to hide
Maintaining coating integrity:
- Use low suction settings: High power can damage the backing material.
- Avoid prolonged contact: Keep the vacuum moving constantly.
- Clean front and back differently: Use standard techniques for the fabric side but gentler approaches for the coated side.
- Watch for separation: Pay attention to areas where the backing might be separating from the main fabric.
Lined Curtains
Curtains with separate lining layers present unique challenges for thorough cleaning.
Dual-surface cleaning approaches:
- Clean each layer separately: Treat the main fabric and lining as distinct surfaces.
- Use appropriate attachments for each side: The main fabric may withstand a different attachment than the more delicate lining.
- Pay special attention to the area between layers: Dust often settles in the space between the main curtain and lining.
Preventing damage:
- Be careful around stitching that connects the layers
- Watch for areas where the lining might have shrunk differently than the main fabric
- Use extra care around any decorative elements like stitching or embellishments
Step-by-Step Cleaning Process
A systematic approach ensures thorough cleaning and prevents damage to your window treatments.
Preparation Steps
Proper preparation makes the cleaning process more efficient and effective:
- Inspect the window treatments: Check for damage, loose parts, or areas that need special attention.
- Test your vacuum: Run it briefly to ensure it’s working properly and not emitting any unusual odors that could transfer to your window treatments.
- Adjust suction power: Set your vacuum to the appropriate level for the specific window treatment material.
- Clear the surrounding area: Move furniture and decorative items away from the window to allow full access.
- Have backup attachments ready: Different sections may require different tools.
Setting Up Your Vacuum
The right setup ensures efficient cleaning with minimal strain:
- Extend the hose fully: This reduces pull on window treatments and gives you better maneuverability.
- Select the right attachment: Start with the most appropriate attachment for your window treatment type.
- Position the vacuum unit: Place it in a central location to minimize dragging and repositioning.
- Check filters: Ensure your vacuum has clean filters to maximize suction and minimize dust redistribution.
- Manage the cord: Position the power cord to avoid tangling or pulling during the cleaning process.
Working Systematically
A methodical approach ensures no area is missed:
- Establish a pattern: Work from top to bottom and from one side to the other.
- Clean in sections: Divide large window treatments into manageable sections.
- Overlap slightly: Ensure no areas are missed between sections.
- Maintain consistent speed: Move at a steady pace, neither too fast (which misses dust) nor too slow (which can damage materials).
Top-to-Bottom Methodology
Gravity is your ally when cleaning window treatments:
- Start at the highest point: Begin with the top rail, headrail, or curtain rod.
- Work downward: Clean systematically from top to bottom so dislodged dust doesn’t fall on already-cleaned areas.
- Pay special attention to the middle: This eye-level section will be most noticeable if incompletely cleaned.
- Finish with the bottom rail or hem: These areas often collect the most dust due to their proximity to the floor.
Dealing with Corners and Edges
Dust accumulates heavily in these often-overlooked areas:
- Use crevice tools: These are ideal for tight corners and along window frames.
- Pay attention to side channels: Vertical blinds and some shades have side tracks that collect significant dust.
- Clean mounting brackets: Dust accumulates in and around the hardware that holds your window treatments.
- Address cord mechanisms: These complex parts can harbor significant dust deposits.
Post-Vacuuming Inspection
After cleaning, verify your results:
- Visual inspection: Look at the window treatment from different angles and in different lighting.
- Touch test: Gently run your fingers along surfaces to detect any remaining dust.
- Light check: For translucent treatments, check for dust by looking through them toward a light source.
- Operational test: Open and close the treatment to ensure smooth operation and to check for any dust dislodged by the movement.
Troubleshooting Common Challenges
Even with the right techniques, certain challenges can arise when cleaning window treatments. Here’s how to handle them:
Dealing with Static Electricity
Static electricity makes dust cling tenaciously to window treatments, especially in dry environments.
Solutions:
- Use anti-static spray: Apply a light mist of anti-static spray to your cleaning cloth (not directly on the window treatment)
- Increase humidity: Run a humidifier in the room before cleaning
- Use dryer sheets: Gently wipe treatments with an unused dryer sheet to reduce static
- Ground yourself: Touch a metal object before cleaning to discharge static from your body
Managing Fragile or Damaged Blinds
Older or damaged window treatments require extra care during cleaning.
Approaches:
- Reduce suction power: Use the lowest effective setting on your vacuum.
- Support damaged areas: Hold fragile sections with one hand while cleaning with the other.
- Skip problem areas: Consider spot cleaning only for severely damaged sections.
- Use indirect cleaning: For extremely fragile items, hold the vacuum attachment slightly away from the surface.
- Consider alternatives: Sometimes a microfiber cloth is safer than vacuum suction for fragile treatments.
High or Difficult-to-Reach Treatments
Tall windows and high installations present particular challenges.
Solutions:
- Use extension wands: Many vacuums offer extendable wands for added reach.
- Create a stable platform: Use a proper step ladder rather than stretching or standing on furniture.
- Consider specialized tools: Long-handled blind cleaning tools can be attached to some vacuum hoses.
- Temporary removal: For some treatments, it may be easier to remove them for cleaning and then reinstall.
Extremely Dusty or Neglected Window Treatments
Severely neglected window treatments may require a multi-step approach.
Effective strategies:
- Preliminary dusting: Use a duster to remove the worst of the build-up before vacuuming.
- Progressive cleaning: Make multiple passes, gradually increasing suction power.
- Sectional approach: Clean small areas thoroughly before moving on.
- Outdoor cleaning: For removable treatments with extreme dust, consider taking them outside for initial cleaning.
When Vacuuming Isn’t Enough
Sometimes vacuum cleaning alone won’t restore your window treatments to their best condition.
Next steps:
- Spot cleaning: For stains or stubborn dirt, follow up with appropriate spot treatment
- Professional cleaning: Consider professional services for valuable or delicate window treatments
- Washing: Some fabric treatments can be machine or hand washed (check manufacturer recommendations)
- Replacement: Extremely old or damaged window treatments may need replacement rather than cleaning
Maintenance Schedule and Preventive Measures
Regular maintenance prevents excessive dust buildup and extends the life of your window treatments.
Optimal Cleaning Frequency Chart
| Treatment Type | Light Dust Environment | Average Home | Heavy Dust Environment | Allergy Sufferers |
|---|---|---|---|---|
| Horizontal blinds | Every 3-4 weeks | Every 2-3 weeks | Weekly | Weekly |
| Vertical blinds | Monthly | Every 3 weeks | Bi-weekly | Weekly |
| Cellular shades | Every 6 weeks | Monthly | Bi-weekly | Weekly |
| Sheer curtains | Every 6-8 weeks | Monthly | Bi-weekly | Weekly |
| Heavy drapes | Quarterly | Every 6-8 weeks | Monthly | Bi-weekly |
| Wooden blinds | Monthly | Every 3 weeks | Bi-weekly | Weekly |
Seasonal Cleaning Considerations
Adjust your cleaning schedule based on seasonal factors:
- Spring: Pollen season requires more frequent cleaning, especially for households with allergy sufferers
- Summer: Open windows bring in more outside dust and pollution
- Fall: Leaf decay creates more outdoor particles that can enter homes
- Winter: Closed windows and heating systems circulate more indoor dust
Preventing Excess Dust Buildup
Proactive measures can reduce dust accumulation between cleanings:
- Use air purifiers: HEPA air purifiers can significantly reduce airborne dust that settles on window treatments.
- Improve HVAC filtration: Upgrade your home’s air filters to capture more dust particles.
- Apply dust repellents: Some fabric treatments can benefit from anti-static or dust-repellent sprays.
- Reduce indoor humidity: Maintain optimal humidity levels (40-50%) to minimize dust mite activity.
- Regular home dusting: Keep surrounding surfaces clean to reduce overall dust levels.
Complementary Cleaning Methods
Combine vacuuming with other techniques for optimal results:
- Microfiber dusting: Use between vacuum cleanings for light maintenance
- Blind cleaning tools: Specialized tools can complement vacuum cleaning
- Compressed air: Can dislodge dust from hard-to-reach areas before vacuuming
- Lint rollers: Effective for quick touch-ups on fabric window treatments
Signs It’s Time for Deep Cleaning
Watch for these indicators that your window treatments need immediate attention:
- Visible dust clouds when adjusting blinds or curtains
- Streaky appearance when light shines through
- Dull colors or muted patterns
- Increased allergy symptoms when near window treatments
- Unusual stiffness in normally flexible fabrics
- Uneven light filtration through translucent treatments
Special Considerations
Some window treatments require unique approaches due to their construction or value.
Antique or Delicate Window Treatments
Irreplaceable or valuable window treatments deserve extra care:
- Consult specialists: Get professional advice before attempting to clean valuable antiques
- Use lowest suction settings: Prevent damage to fragile fibers and connections
- Consider manual cleaning: Sometimes gentle hand dusting is safer than vacuuming
- Test in inconspicuous areas: Always test any cleaning method on a hidden section first
- Document condition: Take photos before cleaning to note any pre-existing damage
Motorized Blinds and Shades
Powered window treatments require special consideration:
- Turn off power: Always disconnect power before cleaning.
- Avoid moisture near motors: Keep cleaning away from electrical components.
- Be gentle around mechanisms: Clean carefully around the motor housing and connection points.
- Follow manufacturer guidelines: Some motorized systems have specific cleaning recommendations.
- Watch for wires: Be careful not to dislodge or damage any wiring during cleaning.
Smart Home Integration for Maintenance Reminders
Leverage technology to maintain cleaning schedules:
- Set calendar reminders: Use digital calendars to establish regular cleaning routines
- Smart home systems: Some smart home setups can track when window treatments were last cleaned
- Maintenance apps: Several home maintenance apps can help track cleaning schedules
- Air quality monitors: These can alert you when increased particle counts suggest cleaning is needed
Commercial vs. Residential Application Differences
Commercial settings have different requirements than homes:
- Frequency needs: Commercial spaces often require more frequent cleaning due to higher traffic
- Equipment scale: Commercial-grade vacuum systems may be needed for large installations
- Health regulations: Some facilities have specific cleanliness requirements
- Scheduling challenges: Working around business hours may be necessary
- Professional services: Commercial settings often benefit from professional cleaning contracts
Environmental Considerations
Modern cleaning approaches should consider environmental impact:
- Energy-efficient vacuums: Use models with good filtration and reasonable power consumption
- Sustainable products: Choose environmentally friendly cleaning products when vacuum cleaning isn’t sufficient
- Proper disposal: Ensure vacuum bags and filters are properly disposed of or recycled
- Water conservation: If wet cleaning follows vacuuming, use water-efficient methods
- Indoor air quality: Proper cleaning improves air quality and can reduce the need for chemical air fresheners
Conclusion
Maintaining dust-free window treatments doesn’t have to be a dreaded chore. With the right vacuum attachments and techniques, you can efficiently remove dust, allergens, and debris from your blinds and curtains while extending their lifespan and enhancing your home’s air quality.
Remember these key principles:
- Choose the right attachments for your specific window treatment type
- Adjust your technique based on material and construction
- Work systematically from top to bottom
- Maintain a regular cleaning schedule appropriate for your environment
- Combine vacuuming with preventive measures for best results
By incorporating these vacuum cleaning techniques into your regular home maintenance routine, you’ll enjoy cleaner, more attractive window treatments and a healthier living environment. The small investment of time in regular maintenance prevents the need for more intensive cleaning later and helps preserve the beauty and functionality of your window coverings for years to come.
Whether you’re dealing with delicate sheers, sturdy wooden blinds, or anything in between, the proper vacuum attachment techniques outlined in this guide will help you maintain pristine window treatments with minimal effort. Your windows dress your home—keep their coverings looking their best with these proven cleaning methods.